How to Install Microtopping & Microcement | Skraffino


How to Install Microtopping and Microcement: A Complete Step-by-Step Video Guide
Concrete microtopping — also known as microcement — has become one of the most sought-after flooring finishes in both residential and commercial design. Offering the sleek, seamless look of bare concrete without the need to pour a new slab, microtopping and microcement are transforming homes, hotels, restaurants, retail spaces, and offices across the globe. From minimalist European apartments to high-traffic commercial lobbies, this ultra-thin concrete overlay delivers a sophisticated, continuous surface that feels distinctly modern and endlessly versatile.
In this six-part video series, hosted by Bob Harris of the Decorative Concrete Institute, Duraamen walks you through the complete application of Skraffino microtopping and microcement — from substrate priming all the way through final sealing. Whether you’re a seasoned concrete contractor or a DIYer exploring decorative overlays for the first time, these videos provide an honest, hands-on look at the process, the products, and the creative possibilities that microcement makes possible.
Why Microtopping and Microcement Are Taking Over the World
It’s hard to overstate how dramatically microcement has grown in popularity over the past decade. What was once a niche finish used primarily by European architects and high-end designers has become a mainstream choice for floor installers, interior designers, and homeowners worldwide.
The appeal is straightforward: microcement and microtopping can be applied directly over existing tile, wood, concrete, or plywood at thicknesses as thin as 20 mils — eliminating the need for demolition and reducing project timelines significantly. This is a major advantage in renovation projects where disruption needs to be minimized. A kitchen, bathroom, or retail floor can be resurfaced and back in service in a matter of days rather than weeks.
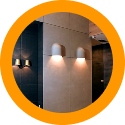
In Europe, particularly in Spain, Italy, and France, microcement has long been a staple of luxury interiors. It’s now equally common in North American commercial and residential spaces, and demand is surging across the Middle East, Southeast Asia, and Australia as designers and contractors discover its flexibility. The material works indoors and outdoors, on floors, walls, and stairs, and pairs beautifully with modern, industrial, Scandinavian, and even rustic interior styles.
Part of what drives microcement’s global rise is the desire for seamless, grout-free surfaces. Traditional tile and stone flooring, while durable, introduces grout lines that collect dirt, require maintenance, and visually fragment a space. Microtopping creates a continuous, flowing surface — one that makes spaces feel larger, cleaner, and more cohesive. In hospitality and retail environments especially, this visual continuity is enormously valuable.
Duraamen’s Skraffino microtopping and microcement is at the forefront of this movement in North America. Available in regular, fine, and superfine grades in both white and gray bases, Skraffino is engineered for both interior and exterior use and can be applied to floors, walls, and vertical surfaces. It’s one of the most versatile, cost-effective, and installer-friendly microcement systems available today.
Video 1: Priming the Substrate with CP1000
Every successful microtopping or microcement installation begins with a properly primed substrate, and this first video makes clear why that step should never be skipped or rushed.
Bob demonstrates the application of acrylic primer CP1000, Duraamen’s concrete primer, which serves as the critical bonding layer between the existing substrate and the Skraffino microcement overlay. CP1000 penetrates into the concrete or substrate surface, creating a mechanical and chemical bond that prevents delamination and ensures the microtopping adheres uniformly across the entire floor.
The video emphasizes the importance of double priming — applying two coats of CP1000 — particularly over porous substrates or in areas with high moisture exposure. Double priming fills surface irregularities, reduces the risk of pinholes, and creates a more consistent foundation for the microcement coats that follow.
Bob also demonstrates mixing and applying the first coat of Skraffino microtopping, showing the proper consistency, trowel technique, and the thin, even application that microcement requires. Getting the first coat right sets up every subsequent layer for success.
Video 2: Integral Color and Second Coat Troweling
One of the most popular features of Skraffino microcement is its ability to be integrally colored, and Video 2 shows exactly how that’s done using Colorfast colors.
Colorfast integral colorants are mixed directly into the Skraffino microtopping before application, distributing pigment evenly throughout the material rather than just on the surface. This means the color is part of the overlay itself — not a coating on top of it — which results in a richer, more natural appearance and greater durability. Because the color runs throughout the material, minor surface scuffs or wear don’t reveal a different shade beneath.
Bob demonstrates tinting the second coat of microcement and explains how layering integrally colored coats builds depth and richness in the finished floor. He also shows the troweling technique for the second coat, which can be worked to create subtle texture variation — a hallmark of the handcrafted, organic look that makes microtopping and microcement so desirable.
The second coat is where much of the artistry happens. Trowel pressure, angle, and direction all contribute to the final appearance, and contractors can develop their own signature style over time.
Video 3: Decorative Coloring with Aquacolors and Patinaetch
Video 3 opens up the full decorative potential of Skraffino microcement by demonstrating the use of both water-based stains and acid stains over the cured overlay.
Aquacolor is Duraamen’s water-based staining system, offering rich translucent tones that penetrate into the microcement surface and add color without obscuring the underlying texture. Water-based stains are predictable, easy to control, and available in a wide range of colors — making them an excellent choice for contractors and designers who want precise results.
The video also covers the application of Patinaetch, Duraamen’s acid stain. Acid stains react chemically with the minerals in the cured cement, creating the distinctive mottled, variegated color effects that have made acid-stained concrete a classic decorative finish for decades. No two acid-stained floors look exactly alike, which is precisely what makes this technique so compelling for one-of-a-kind residential and commercial installations.
Together, Aquacolors and Patinaetch give installers two powerful tools for transforming a plain microtopping surface into something that looks genuinely alive — rich with depth, movement, and character.
Video 4: Stenciling Patterns on Microcement Floors
If integrally colored and stained microcement represents the understated end of the design spectrum, stenciling represents the bold and expressive end — and Video 4 is dedicated entirely to this technique.
Bob demonstrates how stencils are applied directly to the cured Skraffino microtopping surface to create intricate, repeating patterns — geometric tile motifs, organic shapes, borders, and custom graphics. Duraamen’s stencil collection includes patterns ranging from classic European tile designs to modern geometric configurations, giving contractors and designers enormous creative flexibility.
The process involves carefully positioning the stencil, securing it against the floor to prevent bleed-through, and then applying colorants — including Aquacolors water-based stains or Patinaetch acid stains — through the stencil opening to deposit the pattern onto the microcement surface. The result can evoke the look of decorative tile, hand-painted Moroccan cement tiles, or custom architectural graphics — at a fraction of the cost and with the seamless continuity that only microtopping can provide.
Stenciling on microcement is increasingly popular in hospitality environments — lobbies, restaurant entryways, spa floors — where a dramatic first impression is part of the brand experience.
Video 5: Gelled Acid Application for Advanced Effects
Building on the techniques introduced in Video 3, Video 5 takes the acid staining process further with the application of gelled acid — a thicker, more controllable form of acid stain that allows for even more refined color placement and gradient effects on the Skraffino microcement surface.
Gelled acid stain stays where it’s placed rather than flowing across the floor, making it ideal for detailed work, feathered edges, and custom colorwork that requires precision. Bob demonstrates how this technique pairs with stenciling and water-based stain to build layered, complex color compositions that would be impossible to achieve with any single colorant method.
For contractors looking to differentiate their work and offer clients truly custom floors, mastering gelled acid application over microcement is a skill worth developing. The results — warm, luminous, and uniquely textured — are consistently impressive.
Video 6: Sealing the Microcement — Perdure A03, E32, U45, and U46
The final video in the series addresses what is arguably the most important step in any microcement or microtopping installation: the sealing system. No matter how beautiful the underlying finish, a microcement floor will only perform as well as its protective coating allows.
Bob walks through Duraamen’s recommended multi-layer sealing system for Skraffino microtopping, beginning with Perdure A03, a water-based acrylic sealer that penetrates and locks down the surface before the heavier topcoats are applied. Perdure A03 acts as a sealer and primer for the subsequent layers, enhancing adhesion and protecting the colorwork applied in previous steps.
Next comes Perdure E32, a water-based epoxy sealer that adds significant hardness and build to the floor surface. Epoxy provides an excellent barrier against moisture, staining, and abrasion — critical performance properties for floors in kitchens, bathrooms, retail spaces, and other high-traffic environments. Perdure E32 enhances the depth and clarity of the color beneath it, giving the finished floor a polished, professional appearance.
The topcoat layer is applied using either Perdure U45 or Perdure U46 — both water-based polyurethane sealers that provide the final protection and sheen for the microcement floor. Perdure U45 delivers a matte finish that keeps the floor looking raw and understated — perfect for spaces where the goal is an industrial or natural-concrete aesthetic. Perdure U46 provides a gloss finish that amplifies color and creates a sleek, reflective surface more suited to hospitality, retail, or modern residential interiors.
All three sealers in this system — Perdure A03, Perdure E32, and Perdure U45/Perdure U46 polyurethane topcoat — are water-based, making them low-VOC, more pleasant to work with, and appropriate for occupied spaces where solvent-based products would be problematic. Together, they form a sealing system that protects the Skraffino microcement overlay for years of heavy use.
Skraffino Microtopping: The Complete System
What these six videos collectively demonstrate is that Skraffino microtopping and microcement is not just a product — it’s a complete flooring system with clearly defined steps and complementary products at every stage:
Surface Preparation — Proper substrate prep and double-coating with CP1000 primer ensures lasting adhesion and a defect-free finish.
Microcement Application — Skraffino applied in thin, troweled coats, integrally colored with Colorfast, builds a durable, beautiful overlay over virtually any existing surface.
Decorative Enhancement — Aquacolors water-based stains, Patinaetch acid stain, gelled acid, and pattern stencils unlock nearly unlimited creative possibilities within the microcement surface.
Protection and Durability — Perdure A03, Perdure E32, and Perdure U45 or U46 deliver a performance sealing system that protects the finished floor and maintains its appearance over time.
Whether you’re a contractor building your microcement installation skills or a property owner exploring decorative concrete for a renovation project, these videos offer an honest, thorough, and practical guide to everything Skraffino microtopping can do.
Explore Duraamen’s full range of Skraffino microtopping and microcement products, Colorfast integral colors, Aquacolors stains, Patinaetch acid stains, stencils, and Perdure sealers in the Duraamen online store — or contact us to speak with a technical specialist about your next project.